
FINAL DETAILS

Location
The entrance to Lower Drummans is opposite the main entrance to Magilligan Camp and will be signposted. Parking will be in a field.
Key timings
- Sunday 4th, before 16:00: Team Captains to complete team declarations – at the Enquiries tent, at the Classic event.
- Monday 5th 0845 – parking open
- 0940 – call-up for 1st leg runners
- 1000 – 1st leg mass start
- 1045 – 2nd leg mini-mass start (estimated)
- 1130 – 3rd leg mini-mass start (estimated)
- 1200-1230 – prizegiving (subject to minor adjustment)
Access procedure, parking and route to Assembly
Parking will be open from 0845. On arrival, please show your photographic ID and display your car pass to Marshalls (wearing hi-viz vests). Follow instructions into the parking field.
There is a 10 minute walk (600 metres) to the Assembly Area – please follow the blue and white tapes.
If you are arriving late or depart early from the assembly area please follow Marshalls’ (Hi-viz vests) directions to avoid impeding any out-going starters at entrance to Assembly Field.
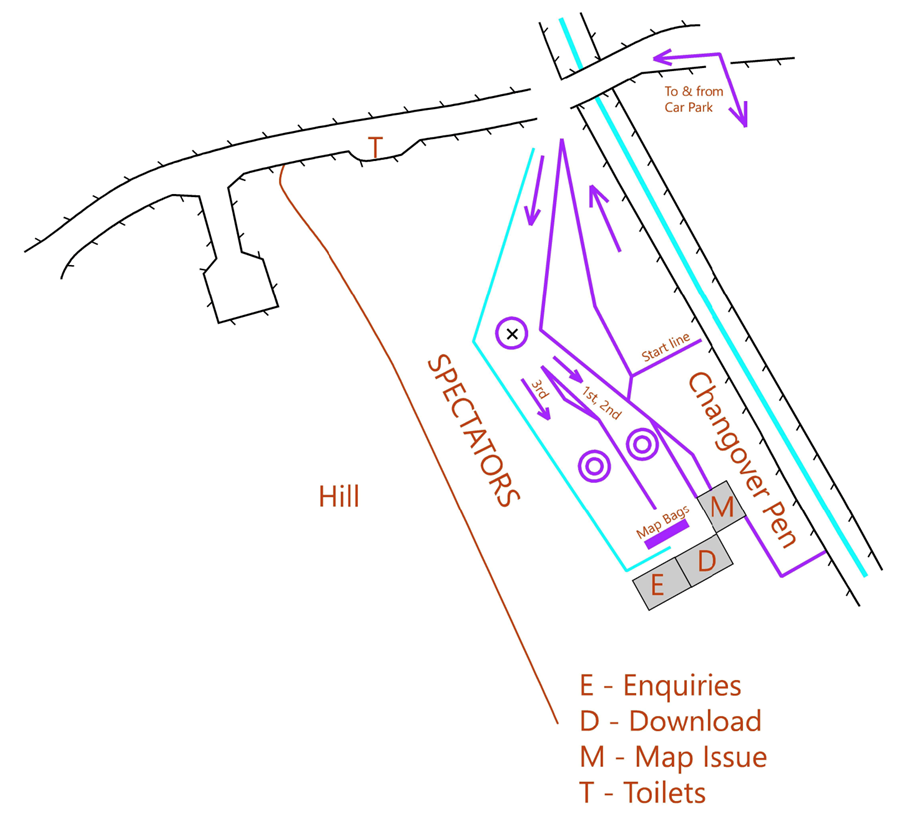
Route to Assembly, Toilets, and Club tents/Spectator area

The Start / Changeover Pen / Finish
PLANNER’S NOTES
Terrain
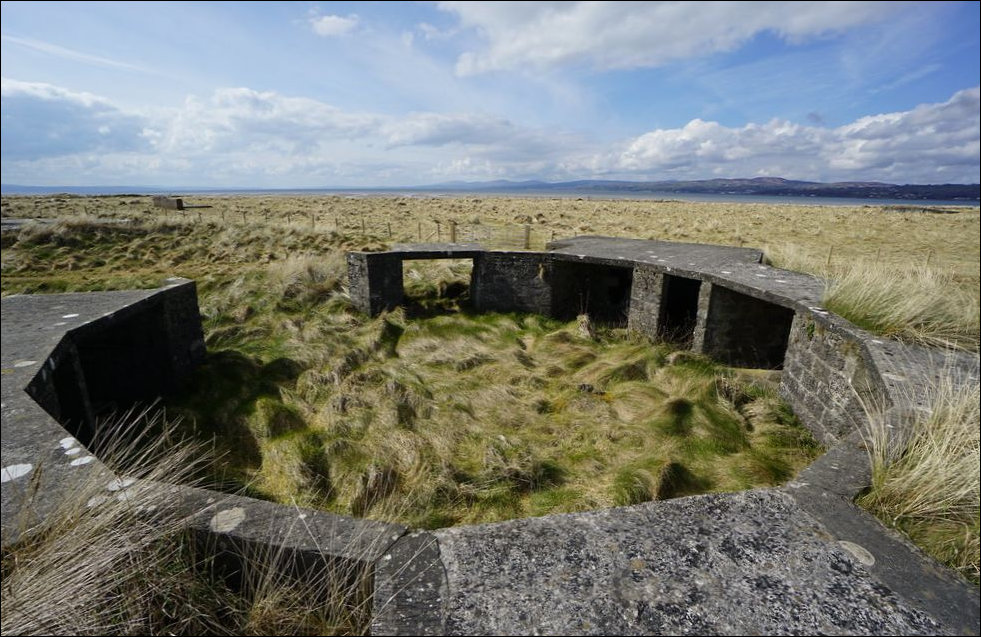
If you’ve looked at the old map of the area you will see that the area is a mix of farmland, sand dunes, and an interesting area of old military ruins, all separated by an uncrossable stream and a multitude of fences.
I have obviously tried to make the most of the good areas and as a result all Courses bar the Yellow and Orange will have a map flip. Each side of the map is clearly labelled Part 1 and Part 2.
The open terrain lends itself to fast, head-to-head racing, but this is orienteering, not cross-country, so I’ve tried to keep you all concentrating right to the end. Consequently, you might want to keep a close check on the control descriptions and numbers. Hopefully the result will be some close competition and a good dose of fun to finish off a great long weekend.
Crossing Points
As mentioned above, the area is divided by an uncrossable stream, marked as OOB on the map, and a multitude of fences. All courses have been planned so that there is no need to even attempt to cross the stream other than via the wooden bridge, so don’t put yourself and others at risk.
The fences in the area are not the easiest to cross. We will be providing a large number of crossing points which will all be clearly marked on the map and in addition all field gates will be left open. All of these are optional; we would prefer you to use them, but you are free to cross wherever you wish.
All crossing points will be marked in the terrain with Red/White tapes.
Military Debris
The area is scattered with military debris from training exercises. Please do not touch.
Animals
The area is extensively used for grazing sheep and cattle. These will all be moved to adjacent fields for our event but please be aware that ALL participants, including youngsters may come across the remains of dead animals.
Additional Map Symbols
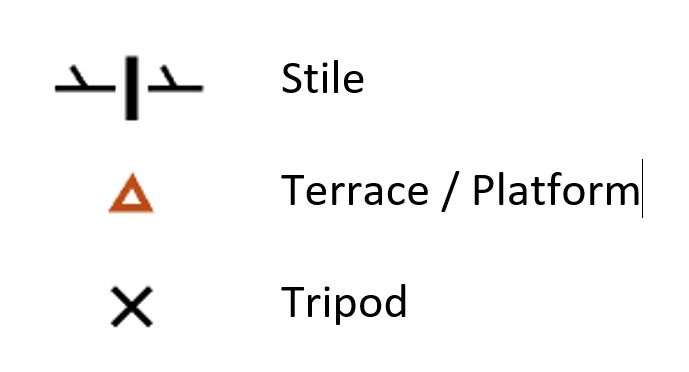
In addition, please note that all overhead power lines have been omitted from the map.
Classes and Courses
Open Premier: 1:10000 A4, c. 5.5km, 40m Climb, 23 controls
Women’s Premier: 1:10000 A4, c. 4.5km, 30m Climb, 20-22 controls
Brown: 1:10000 A4, c.5.5km, 40m Climb, 23 controls
Blue: 1:10000 A4, c. 4.5km, 30m Climb, 20-22 controls
Green: 1:7500 A4, c. 3.5km, 25m Climb, 17-18 controls
Short Green: 1:7500 A4, c. 3.1km, 25m Climb, 15 controls
Very Short Green: 1:7500 A4, c. 2.6km, 20m Climb, 12 controls
Light Green: 1:7500 A4, c. 2.3km, 20m Climb, 11-12 controls
Light Green 2: 1:7500 A4, c. 2.8km, 20m Climb, 13 controls
Orange: 1:7500 A4, c. 2.1km, 10m Climb, 10 controls
Yellow: 1:7500 A4, c. 1.8km, 5m Climb, 10 controls.
Control Descriptions
Description’s for ALL Courses will be Pictorial. These are all shown on the map. No loose description sheets will be provided.
Controls
All Controls will be SI AIR enabled – apart from the FINISH – it is a punching control!
Start Lists
Team start lists will be published on the event website on the Sunday evening
COMPETITION NOTES
Water
Water will not be provided, so competitors are advised to provide their own.
Bib & SI Check & Map Issue
All team members must proceed to the start area via the map issue tent. Follow the directions of the marshals at all times and allow sufficient time to be issued your map.
Upon entering the tent you will be directed to the SI Punch Entry Check table. SIAC battery check, check and clear boxes will be found on the entry to the map issue tent.
This will confirm that you are a registered member of a team and that you have the correct dibber assigned to your Bib number. If there is a problem with your dibber, please go to the problem desk.
A marshal will direct you to the correct table for your Bib number and Leg. These will also be labelled clearly. Join the correct queue and have your bib number clearly visible.
When you get your sealed map, it is your responsibility to check that the Leg and Team number visible on the front of the sealed map are correct. Any problems will be resolved by the problem desk, not the map issue team.
A secondary check and clear box will be available for competitors after leaving the map issue tent. There will be a further Bib/Map check at the Start/Changeover line. If the Map or map seal has been tampered with, your team may be disqualified.
1st Leg Start Process
All 1st leg competitors will proceed to a holding pen where you will be able to continue with your warm-up.
You will be called forward by 5 mins before the mass start at 1000 and your Bib and Map will be checked. A clock will be visible, but you must follow all verbal instructions by the Start team.
After starting, all legs must follow the taped route all the way to the start kite.
2nd and 3rd Leg Handovers
Leg 2 & 3 runners must wait in the holding pen until their Team number is called out, or until they can see their incoming runner (there is a good line of sight to see all runners approaching the last control ). Only then can you enter the Handover box.
When entering the Handover box, your map will be checked to see that it is still sealed.
Finish, Download & Map Collection
The Leg 1 & 2 Finish will be to the left-hand side of the fork on the run-in.
You must proceed to the Handover line where you will ‘tag’ your teammate, who may then start the next Leg.
Then proceed to the punch the Finish control – it is a punching Finish control.
Deposit your map in the correct map bag and then proceed to Download.
Do not block other runners, following the instructions of the marshals at all times.
3rd Leg Finish
Leg 3 runners should follow tapes to the right of the fork in the run-in, passing under the finish arch before punching the Finish box.
It is a punching Finish control.
For the purposes of prizes and placing, team positions will be determined by the order of finish over the Finish line (under the finish arch).
If there are close finishes, marshals will direct teams to punch in the order that you finish over the line, even if this means a small time delay to teams that finished behind.
Please follow the marshal’s instructions at all times.
After finishing, all runners must proceed to Download.
Map drop
Map drop will be organised by club and all maps must be surrendered until the Leg 3 mini mass start at 11:30.
Please follow the marshal’s instructions.
Bags will be labelled by club. For runners without a club, there will be a single bag for map collection and these may also be collected from the tent provided for such runners at 12:30.
Error: Contact form not found.